Linux Namespace
Linux Namespace提供了一种内核级别隔离系统资源的方法,通过将系统的全局资源放在不同的Namespace中,来实现资源隔离的目的。不同Namespace的程序,可以享有一份独立的系统资源。目前Linux中提供了六类系统资源的隔离机制,分别是:
Mount: 隔离文件系统挂载点UTS: 隔离主机名和域名信息IPC: 隔离进程间通信PID: 隔离进程的IDNetwork: 隔离网络资源User: 隔离用户和用户组的IDCgroup: 隔离进程组 (process groups) 所使用的物力资源 (如 cpu memory i/o 等等)
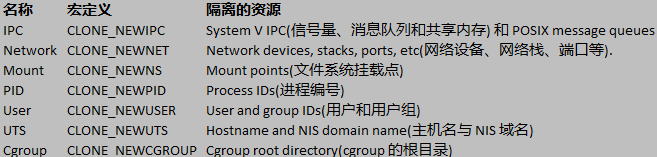
表中前六种Namespace正是实现容器所必须的隔离技术。
Network Namespace(转)
linux 中与Network Namespace相关的操作的子命令是 ip netns
ip netns add xx 创建一个 Namespace
1 | ip netns add net1 |
ip netns exec xx yy 在新 namespace xx 中执行 yy 命令
1 | ip netns exec net1 ip addr |
上面 bash 不好区分是当前是在哪个 shell,可以采用下面的方法解决:
1 | ip netns exec net1 /bin/bash --rcfile <(echo "PS1=\"namespace net1> \"") |
每个 Namespace 在创建的时候会自动创建一个回环接口 lo ,默认不启用,可以通过 ip link set lo up 启用。
Network Namespace 之间的通信
新创建的 Namespace 默认不能和主机网络,以及其他 Namespace 通信。
可以使用 Linux 提供的 veth pair 来完成通信。下面显示两个 Namespace 之间通信的网络拓扑:
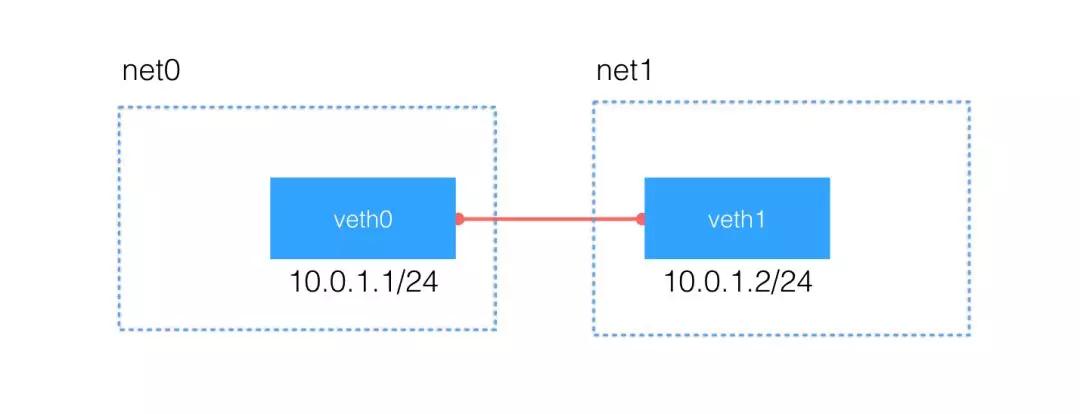
ip link add type veth 创建 veth pair
1 | ip link add type veth |
使用命令 ip link add xxx type veth peer name yyy 指定 veth pair 的名字。
ip link set xx netns yy 将 veth xx 加入到 namespace yy 中
1 | ip link set veth0 netns net0 |
给 veth pair 配上 ip 地址
1 | ip netns exec net0 ip link set veth0 up |
可以看到,在配完 ip 之后,还自动生成了对应的路由表信息。
ping 测试两个 namespace 的连通性
1 | ip netns exec net0 ping 10.1.1.2 |
多个不同 namespace 之间的通信
2 个 namespace 之间通信可以借助 veth pair ,多个 namespace 之间的通信则可以使用 bridge 来转接,不然每两个 namespace 都去配 veth pair 将会是一件麻烦的事。下面就看看如何使用 bridge 来转接。
拓扑图如下:
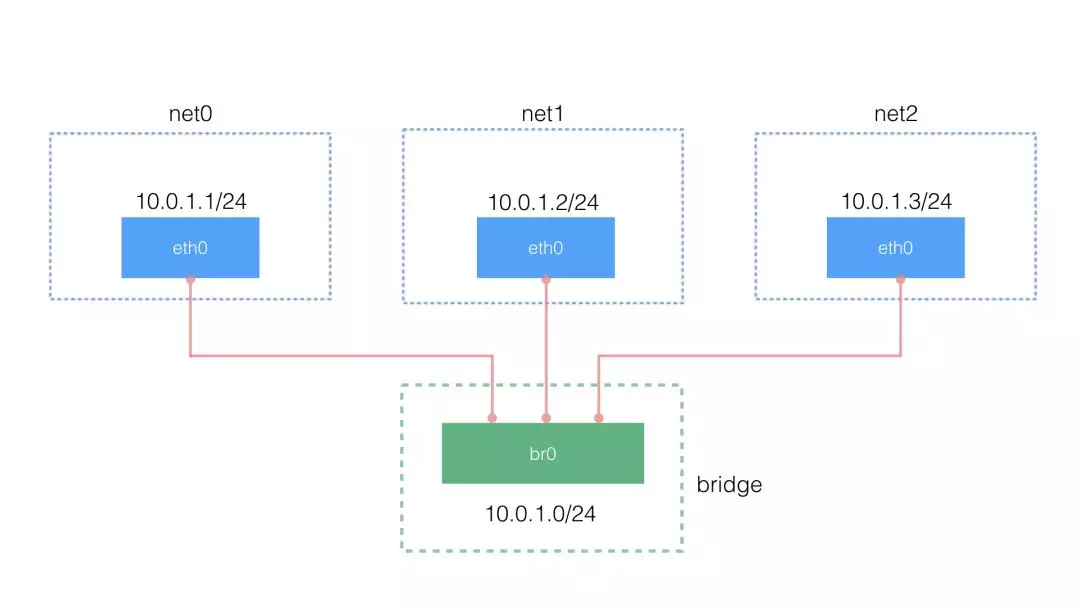
使用 ip link 和 brctl 创建 bridge#
通常 Linux 中和 bridge 有关的操作是使用命令 brctl (yum install -y bridge-utils ) 。但为了前后照应,这里都用 ip 相关的命令来操作。
1 | Copy// 建立一个 bridge |
创建 veth pair
1 | Copy//(1)创建 3 个 veth pair |
将 veth pair 的一头挂到 namespace 中,一头挂到 bridge 上,并设 IP 地址
1 | Copy// (1)配置第 1 个 net0 |
这样之后,竟然通不了,经查阅 参见 ,是因为
原因是因为系统为bridge开启了iptables功能,导致所有经过br0的数据包都要受iptables里面规则的限制,而docker为了安全性(我的系统安装了 docker),将iptables里面filter表的FORWARD链的默认策略设置成了drop,于是所有不符合docker规则的数据包都不会被forward,导致你这种情况ping不通。
解决办法有两个,二选一:
- 关闭系统bridge的iptables功能,这样数据包转发就不受iptables影响了:echo 0 > /proc/sys/net/bridge/bridge-nf-call-iptables
- 为br0添加一条iptables规则,让经过br0的包能被forward:iptables -A FORWARD -i br0 -j ACCEPT
第一种方法不确定会不会影响docker,建议用第二种方法。
我采用以下方法解决:
1 | Copyiptables -A FORWARD -i br0 -j ACCEPT |
结果:
1 | ip netns exec net0 ping -c 2 10.0.1.2 |